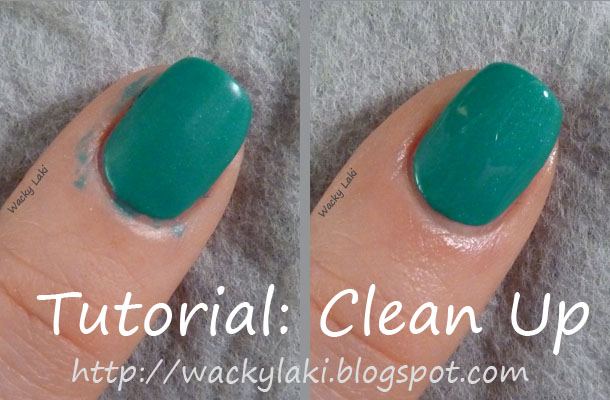
Supplies:
- 100% Pure acetone - Even though for removing nail polish I use my acetone with glycerin mix, for clean up I prefer to use pure acetone. This is what works best for me, but this technique will work with other nail polish removers, if you are not an acetone fan.
- Eyeliner brush - I have tried different brushes for clean up and find that the shape and flexibility of this type of brush works best for me. However, I suggest experimenting with different brushes to find one that works best for you.
- Contact lens case - Any small, airtight container should work. I happen to have lots of contact lens cases around, so I dedicated one to manicures. This allows me to reuse the acetone for multiple manicures. I just keep adding pure acetone when it runs low and I like that I don't have to waste it after each clean up because it has a cap. The right side of my contact case has acetone and the left side has water. I use the water to rinse the acetone off the brush after using it. This helps extend the life of the brush.
- Cuticle Pen - This is my favorite way to moisturize the cuticles after pure acetone. I use the Elf Nourishing Cuticle Pen that I get for $1 at Target. It has a stiff tip that allows me to apply the oil while the polish might not be completely dry yet without ruining the manicure.
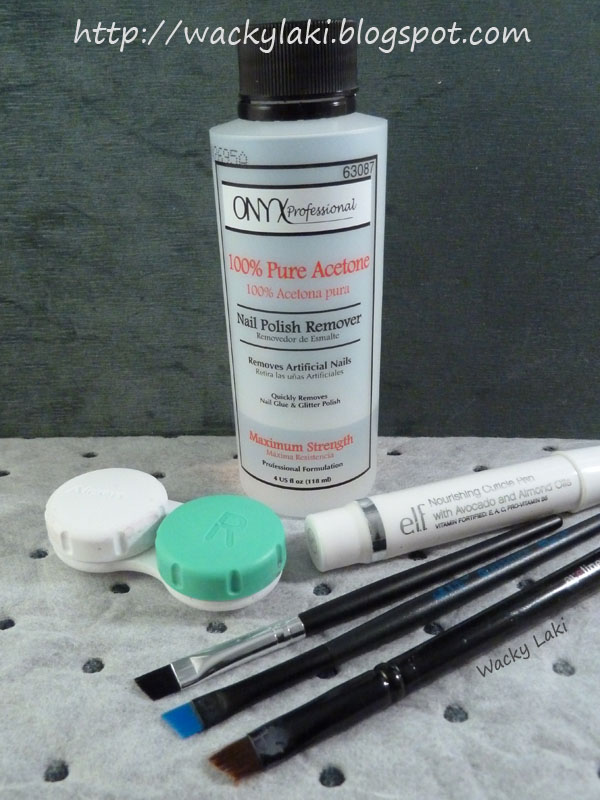
A closer look at the brushes. All of these are inexpensive eyeliner brushes and all work equally well. I like the eyeliner brushes because they are flat and easily fit the contour of the nail.
- Top - This is a Wal-Mart store brand brush. It is inexpensive, but the bristles fall out extremely quickly (quicker than any other brush I've used). I bought a few at once so I have a new one to show here, but I rarely use this brush now.
- Middle - An Essence brush. This brush works very well and so far has held up perfectly to acetone.
- Bottom - This is a Target store brand brush. It is my most used and abused brush. I love it and used it for this tutorial...

Start:
- Apply a base coat and desired number of coats of nail polish
- Note: I go through the clean up steps prior to adding a top coat, but you can choose to apply a top coat before the clean up. I find that cleaning up before the top coat works better for me for two reasons. One, while I'm doing the clean up, the nail polish has time to dry and the topcoat doesn't bubble as much as it does over fresh polish. Two, the top coat is more stubborn to remove so it makes the clean up process longer.
Step 1:
- Pour some acetone into a small container (it is slightly pink in the photos from a previous manicure).
- Dip the brush into acetone
- Run the brush along the side of the container to get rid of excess acetone. This helps ensure that the cuticles don't get flooded with acetone and ruin the manicure.

Step 2:
- Place the brush at the base of the nail
- Sweep the brush along the cuticle toward the tip to remove the excess polish
- Rinse the brush in acetone
- Repeat the sweeping motion with the brush if needed until all of the excess polish is removed

Step 3:
- Starting at the base again, run the brush along the other side of the nail (I turn my nails to face me so that the the brush is never blocking my view of the nail)
- Rinse the brush and repeat as necessary until the cuticles are clean

Step 4:
- Apply a top coat (if not already applied)
- Using a cuticle oil pen, run along the nail in a similar sweeping motion as with the brush in Steps 2-3

Done!
- Allow the nails to dry and enjoy!
I hope found this tutorial useful. Please let me know what you think of it!
Thanks for looking!
Anutka :)

So glad you shared this! This is exactly what I do except I never even thought about using a contact lens case.. That is purely genius! I will definitely have to do that.
ReplyDeleteFantastic, I now know what I need to pick up on my next target run! Thanks for he info.
ReplyDeleteJww
I love this - I always just use a pointed q-tip, but this is great. I appreciate seeing something different and informative :)
ReplyDeletegreat tutorial. i have just started doing the same thing, except i don't use a cuticle oil pen. i've been wanting to get the elf one. do you recommend it?
ReplyDeleteThank you so much for putting this up! I have been struggling with q-tips to get my nails clean, I never thought of using a brush! Thank you again!
ReplyDeleteGreat idea! The contacts lens case is such a great idea that I'm definitely going to use now. I'm going to try this next time I clean up my nails.
ReplyDeleteThanks for the tutorial. Love this idea since I don't want to have to purchase more q-tips, and I'm sure works better. And since I have tons of contact cases as well, I love having a way to use one. :)
ReplyDeleteThis is totally handy (hee hee) I always try to clean with a Q-tip, smudge city. Thank you!
ReplyDeleteHehe I'm following exactly the same procedure! But the more I polish my nails, the less clean up I have to do :) And I also had this essence brush once - it got bold after a couple of weeks :( But the elf oil stick is amazing - I'm using it too :)
ReplyDeleteI feel like I am the only person on the planet who doesn't do this clean-up! I just use my fingernail to make a cleanish line around the cuticle. I am too uncoordinated to do the brush-and-acetone thing--I just end up taking off a huge chunk of polish.
ReplyDeleteI've had the same experience as Ritterbraten: the Essence eyeliner brush started to shrimp after each time of use... And suddenly it got bold.
ReplyDeleteI now use a brush that has probably real hair, because this one seems to last forever :)
Excellent tips here, I now have some shopping to do!! Thanks! :)
ReplyDeleteA very easy way I use to clean up my nail polish on fingers and cuticles is with a pencil eraser. After the polish is dry, it easily rubs it off.
ReplyDeleteThat's a very nicely put together tutorial!
ReplyDeleteGreat tutorial! I always wondered how you got them so clean and neat without ruining the manicure. It always takes me forever! I'll definitely be giving your method a try! Thanks again!
ReplyDeleteCheck out my blog if you get a chance! :)
http://dreaminginexposures.blogspot.com/
I'm so glad that this tutorial was useful! Thank you for all your wonderful comments and input!
ReplyDelete@Mari Jo, thank you!
@Collegiate Nail, I'm so glad you like the idea :)
@joycelyn, you are so welcome!
@Megan, Qtips work great for large areas, but I can never get too detailed with them :)
@Pink Tattoo, yes I do recommend the elf pen. I use it after every manicure and love it.
@minngo4s, you are so welcome! Let me know how this works for you :)
@Brianna, thank you! Let me know what you think of this method...
@Courtney, I'm always looking for ways to use them too :)
@Uma Puma, give the brush a try, let me know what you think! :)
@Ritterbraten, yes, it is true, the more I polish the less cleanup I need. Sad about the essence brush, mine is still holding up for now
@Madeline, just do what works well for you. Your nails always look lovely :)
@KimsKie, my brush hasn't gone bald yet, but I'm sure it will since it did for both of you. I use my Target brush most of the time.
@Stacy, you are welcome, always glad to help with the shopping list ;)
@Anonymous, that is so interesting, I have not heard of this method before. Thank you for sharing!
@Nailstyle, thank you so much!
@Dreaming, I'm glad you like it, let me know how it works out for you! :)
Great tutorial! I love the color you're wearing too!
ReplyDeleteThank you so much! I'm glad you like it. The color is Sinful Colors Rise and Shine
ReplyDeleteI use the same angled eyeliner brushes, they work so well! I like your step by step pics.
ReplyDelete@GelaNails, the angled brush works so well for this. I'm glad you like the tutorial :)
ReplyDeleteI never thought to use an eye liner brush. Thats a great idea, Thanks.
ReplyDeleteThank you! Let me know how it works out for you :)
ReplyDeleteFab tutorial! I have the same brush, same contact case, and same acetone! Great minds think alike ;) Love this method. Thanks for the post!
ReplyDeleteThank you . . .the q-tip was not working for me!
ReplyDelete@Rachael, how funny is that! I'm glad to hear it :)
ReplyDelete@kayec, this should work much better than qtips for you :)
Fantastic!! Tks, tks, tks!! ;)
ReplyDeleteThank you for the tutorial! Attempting to clean my cuticles with q-tips was not working.
ReplyDeleteYou are welcome ladies! I'm glad this was useful :)
ReplyDeleteThe qtip only works for the big stuff if I really make a mess. Too hard to clean close to the polish with it :)
Thank you for this tutorial! I was looking for a good clean-up tutorial, this is the best I've seen! I found your blog on Google, I'm excited to read all your other articles :)
ReplyDelete@HausOfMordollwen, I'm so glad you found this useful! I tried to make it as clear as possible :)
ReplyDeleteThis is great, thank you so much! I've been scouring clean up tutorials for specific brush recommendations--yours is the only one I can find! I'm going to be getting the up&up target brand brush now :)
ReplyDelete@Mayette, that is wonderful! It is definitely my favorite brush to use :)
ReplyDeleteI don't have contacts so I picked up a couple little round travel things at Walmart. I put the acetone in and it started eating the containers! It made them glue to my table! I don't know what they were made of but just a tip to be very careful what you put pure acetone in!
ReplyDelete@Trixie, oh no! I'm sorry it melted your container. The contact lens cases are holding up really well. I'm using the same one for over a year now. Thank you for the tip! I'm sure it will help someone avoid the same problem!
ReplyDeleteI use the same brushes and the same cuticle oil pen ;)
ReplyDelete@Carolina, your manicures are always flawless, so I'm thrilled to hear that! Both the brush and the cuticle oil pen have been working really well for me :)
ReplyDeleteI am so glad to hear that! Thank you dyahdeedee :D
ReplyDeleteI love this method. I was using one of the remover pens at $5+ a pop, and the tips break off too fast. I use the same brush from Target, and it works perfectly. Can't beat it for $1.90. So much better than the Walmart crap, and cheaper, too!
ReplyDelete@MOMCAT14C, I'm glad this is working for you! It is definitely better than the pens and gives more control too! I love it :)
ReplyDeleteThis is a great tutorial, I just need to hit target now!
ReplyDeleteOne thing I'm always curious about with nail blogs is why no one ever talks about doing the right hand? Can you offer any tips for making it as pretty as the left? (Or right if you're left handed)
I'm glad you enjoyed this tutorial! I use the exact same technique for cleaning up my left hand as I show here. For cleaning the right hand, sometimes it helps to hold the brush still and move my nail rather than moving the brush.
DeleteI will try to create a post with tips and tricks! :)
Thank you so much!!! I keep painting my nails and part of my cuticles every time, and my cleaning tecnique isn't quite perfect yet, and your tutorial help me a lot!!! I send you regards from Argentina ;)
ReplyDeleteI'm so glad you found this helpful! I hope you enjoy your beautiful manicures and hopefully you are an expert at cleanup now :D
DeleteThanks for this. It has answered several questions I had about cleaning up my fingers after doing my nails. I appreciate your sharing it with us all. It will definitely make my manicures a lot more pleasurable to do each week.
ReplyDeleteYou are so very welcome! I'm glad you enjoy your manicuring sessions now! It is a fun treat and always fun to have a nice mani :)
DeleteHi there! Great tutorial.
ReplyDeleteCan I ask how you get the brushes themselves completely free of polish when you are done using them? I've been using brushes for a while but they are so stiff because I can't seem to get them very clean. I'm just using acetone and wiping them with a paper towel. Would some sort of oil work?
Hi! Thank you very much! I'm glad you enjoyed this tutorial.
DeleteMy brushes also get stiff also from the acetone. I make sure to rinse them well in acetone when I'm done. Although they do get stiff, but soften right up when I dip them in acetone again. Since these brushes are dedicated to clean up only, I don't worry too much about them getting stiff.