Monday, October 17, 2011

Day 17 - Glitter - Wet n Wild Night Prowl

I have been bit by the Halloween bug and really excited about dark vampy colors. So, for the glitter challenge, I reached for a color that is both deliciously dark and glittery. The glitter was a bit hard to capture with the camera and it looks better in person. The color is Night Prowl from the Wet n Wild main line, but it has recently been re-released (as far as I can tell) as Purple Potion in the tombstone shaped Fantacy Maker.

The polish itself is a black base packed with purple glitter. The glitter sparkles beautifully through the base and is not at all overpowered by the black. Application was great, I applied two coats plus a top coat. It probably could have benefited from a thicker topcoat or at least a second layer. I have been wearing it all weekend and loving it :)


Just look at that glitter...


Outside, slightly blinded and very reflective in the sun...


Brand: Wet n Wild  
Collection: Wild Shine - Main Line  
Color Name/Number: Night Prowl, C467

Free of Formaldehyde, Toluene, Dibutyl Phthalate (DBP)

Thanks for looking!
Anutka :)

Friday, October 14, 2011

Acetone+


I mentioned earlier in the week that I broke 6 out of 10 of my nails over the weekend. Now those are pretty bad odds if you are a nail, so I decided to give them some much needed R&R and try to figure out why they have been so weak and splitting lately. It could be a lot of things causing it, but for me it is probably the increased stress, nail polish and acetone use. Since there is not much I can do about stress and I'm not ready to give up nail polish, I decided to do something about the pure acetone.

I have heard rave reviews of Zoya's Remove+, but have been hesitant to shell out the big bucks. I decided it was time to try loodie loodie loodie's dupe for the much talked about remover. For the full, detailed explanation of how this works, please make sure to visit her blog post. Her blog is just amazing when it comes to nail care tips and techniques.

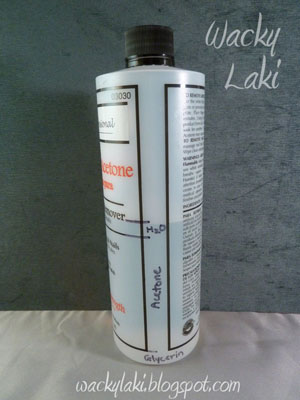
I started out with a 16oz bottle of 100% Pure Acetone, a 6oz bottle of Glycerin and an empty acetone bottle for mixing (not in the photo, but identical to the acetone bottle).


Per loodie loodie loodie, the proportion of glycerin to acetone is about 1-2 tablespoons to 200mL. In an attempt to make the recipe easier for me to duplicate in the future, I went with existing lines on the bottle. I poured glycerin to the 1st line on the bottle. It took a little less than 1/4th of the glycerin bottle (about 1.5oz or 3 tablespoons). I then poured acetone to the next line on the bottle (about 8oz = ~240mL).

I shook the heck out of this mixture which promptly separated when I stopped shaking, so I started adding water in little bits and shaking in between until all of the glycerin was incorporated into the acetone. It ended up taking about 3 tablespoons of water for this to happen.

I marked everything on the bottle so you can see the proportions here...


So did it work? YES, I love this remover. Over the years I have tried a number of nail polish removers with and without acetone and have always been frustrated at how much effort it took to remove the nail polish. If this is an even close dupe to Zoya's Remove+ (which I have never tried), then I can see why it is such a big hit. Using this mixture of acetone + glycerin worked just as well as pure acetone for removing the polish, but take a look at my nails...


Nail polish on the index finger was removed using pure acetone and on the middle finger using the acetone + glycerin mixture. The nail, cuticle and skin around the nail on the index finger were white and dry after just a few swipes with the acetone soaked cotton ball. The middle finger actually looked better after I removed the polish than before. Is that even possible? Either way, I love it! I can't believe the difference. It is the only thing I'll be using on my nails from now on :)

UPDATE: See my followup post with an improved formula.

What are your thoughts on this?

Thanks for looking!
Anutka :)

Thursday, October 13, 2011

Halloween Inspiration...

While my nails are still getting some much needed R&R, I have been catching up on blogs I follow and admiring some of the Halloween manicures out there. I thought I would share a few that struck my fancy :)

I might have to give one or two of these a try... what about you?

Andayn NailsAndayn Nails


Simply Rins
** includes tutorial **


Simply Rins
** includes tutorial **


Colores de Carol


Tartofraises Nail Art


I'm Feeling Nail-Venturous


Nails by Kayla Shevone
** includes tutorial **

Thanks for looking!
Anutka :)

Monday, October 10, 2011

Surviving the Weekend...

This weekend was quite a hectic one for me and those involved as my dad was celebrating a big milestone birthday. My brother and I decided to throw him a party at my house which meant about 40 people including kids. The cleaning, cooking, serving, then more cleaning (some of which is still left to be done) did quite a number on my hands and nails. Six of the ten nails did not survive the grueling test and my cuticles need some major care... However the party was a success and we are so so happy to have done that for him.

My boyfriend was celebrating his own big accomplishment as well, as last Thursday he passed the citizenship exam and was officially sworn in to be a US Citizen. I'm so proud of him :)

So with all that said, I wanted to show the result of the small poll that ran on my blog to determine the next tutorial people would like to see. Majority of people voted to see the gradient nails from day 10, but there were also four requests for the stripes manicure and one for the leopard nails. There was also a request for the flower manicure made outside of the poll. I will hopefully be posting the gradient nails tutorial next week, after my nails recover and grow out a little bit. The other tutorials will follow as well :)


Thanks for looking!
Anutka :)

Friday, October 7, 2011

Day 16 - Tribal Print

No Bundle Monster plates were harmed in the making of this manicure, but they were put to good use. I was nervous about doing free hand tribal print for the challenge, so I decided that my Bundle Monster plates would be perfect. I used partial designs from plates BM-202, BM-204, and BM-213.

For the base color I used Cosmetic Arts nail lacquer. Since it does not have a name on it, I'm guessing it is either Pink Rush or Pink Lust from the Neon Collection. Trust me when I say this color really is neon and bright. My camera freaked out and made it look red which is why I didn't bother posting swatches. They are not color accurate at all. When I figure out how to take proper photos of this color, I will post swatches.

I love the result, now I just need to find a faster way to do this :)


My inspiration for the manicure was a tribal print dress worn by Blake Lively. I'm not a big fan of yellow, so I did not have an exact color match to her dress in my collection. I chose to switch the base color entirely to a neon pink and I'm really happy with the result. I think for me that made the manicure more wearable, but if I ever get a yellow that shade, I will have to try this again :)


I'd love to know what you think!

Thanks for looking!
Anutka :)

Wednesday, October 5, 2011

Day 15 - Delicate Print - Zoya Casey Stamped with Petites Fairy Pink

For me, delicate print equals subtle print and I just love subtle stamping. I've done it quite a few times before and have always been happy with the result. It is fun to see people do a double take to get a closer look at the detail on the manicure. The challenge of delicate print was therefore a fun one for me. I started out with two coats of Zoya Casey, a gorgeous deep plum color. In my excitement to stamp, I forgot to take pre-stamping photos, so I will have to re-swatch it another day. For the stamping I used Petites Color Fever in Fairy Pink. It is a pink base with micro shimmer in pink, gold, copper, green, and just about everything else. A very pretty and unique color in my collection. The stamping was done using Bundle Monster plate  BM-214.

I like the color combo, just wish my stamping was not slanted. On the plus side though, it is equally slanted on all the nails ;)


A few closer looks... (you can also click on the photos to zoom in)...


What do you think of subtle stamping?

Thanks for looking,
Anutka :)

Monday, October 3, 2011

Day 14 - Flowers

Sometimes manicures are cool and sophisticated, sometimes dark and mysterious, and sometimes just plain silly. For me, the challenge of flowers brought out my silly side. It all started with Sally Hansen Mint Sorbet which was topped off with free handed daisies and sponged tips. Certainly not a manicure I can wear to work, but so much fun to make :)


Polishes used for this manicure:
- Sally Hansen - Mint Sorbet (base color)
- Sinful Colors - Envy (sponged tips)
- Ulta Professional - Green with Envy (daisy stems)
- Barielle - Tight Knit (daisy centers)
- Nail Star Two Way Nail Art Pen - Yellow (daisy centers)
- Wet 'n Wild - French White Cream (daisy petals) - I forgot it in the lineup below :(


I hope you like this fun mani. Let me know what you think :D

P.S. Don't forget to vote for the next tutorial you would like to see...

Thanks for looking!
Anutka :)
Related Posts Plugin for WordPress, Blogger...